Tuesday, July 6, 2021

A small welding project

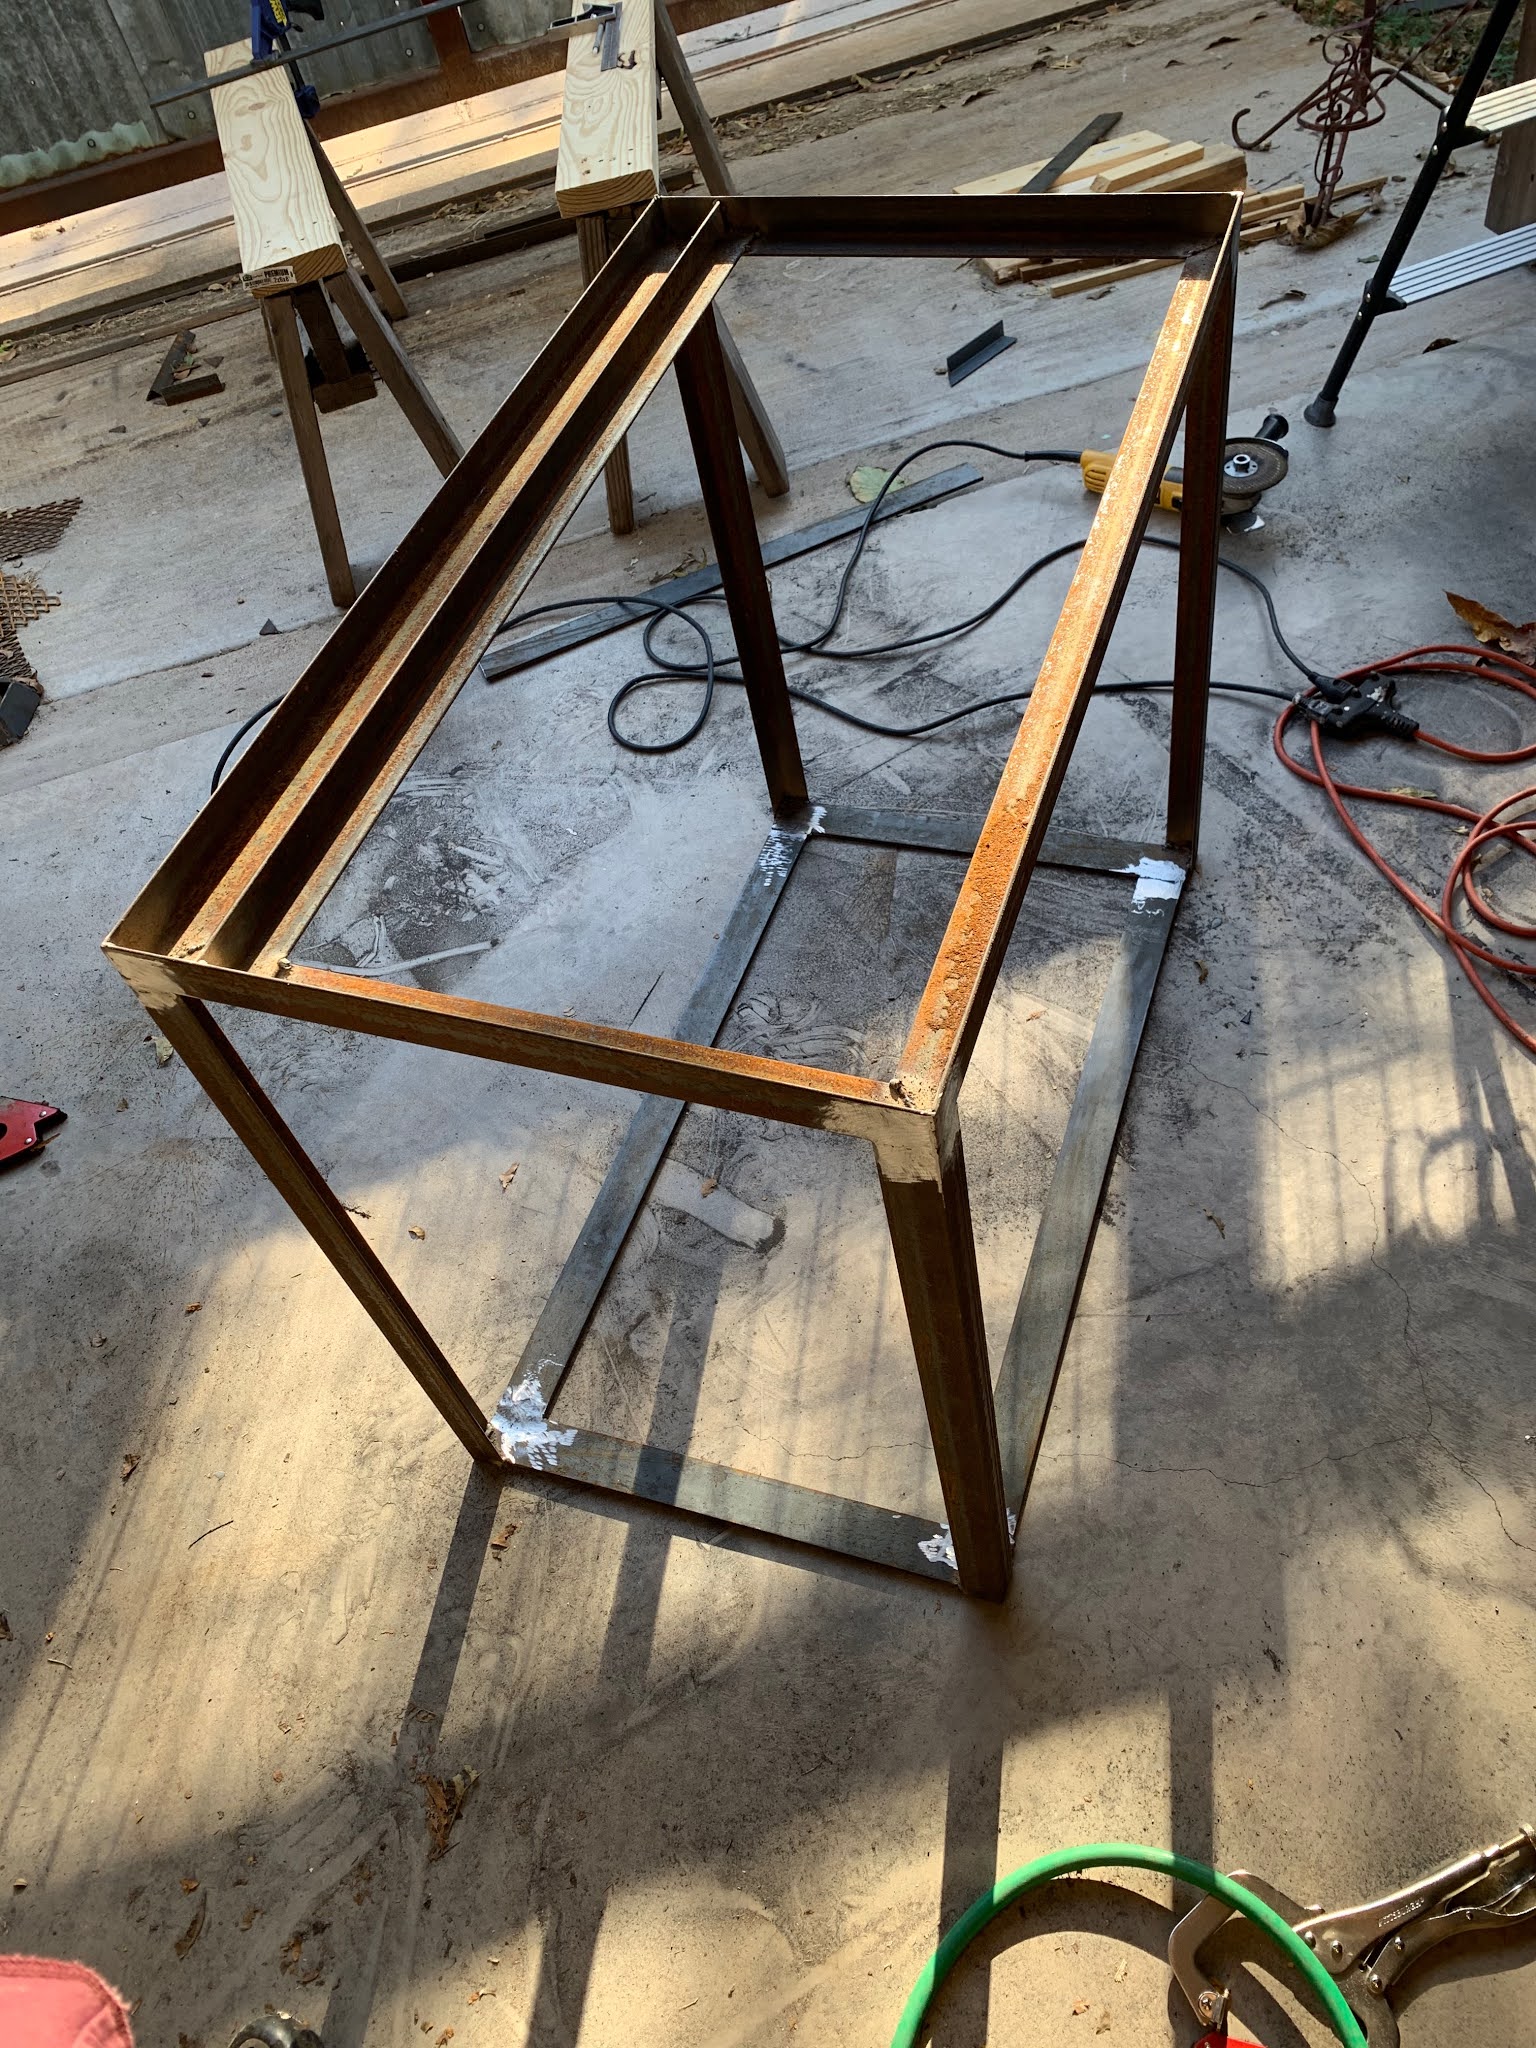
This is most of the pandemic storage stuff. I'm currently without my bigger photo archive, so the suspended steel framed shelf will have to be added in later. The other stuff was interesting to make, too. Here it is.

I made a couple variations on this to get my storage cabinets off the ground and put bulky items underneath. The extra lip is for clearance behind the cabinet: either for storage or for light switch access.

The one below needed clearance underneath for the contractor saw, so the end is framed in steel bar, rather than angle iron.
This one was a little more straightforward

They only freed up about 12 square feet of floor space, but it's amazing how much clutter that actually eliminates.


The COVID stuff : finding use for salvaged materials

 Even though I worked onsite full-time through the pandemic, I found some time to experiment with some furniture and build in some storage. The furniture was all made using salvaged materials. I think a lot of people found that their spaces could use an upgrade and a purge during the pandemic. I did a little bit of both:


I made this chicken coop for a friend's flock out of the old siding and other scraps. I did use new lumber for the overall frame, but all the cladding is salvaged from one thing or another.

Made a little outdoor mounted box for my gardening hand tools as well.

And I made this rustic sleeper sofa. The slab of foam was already on hand, somewhat dictating the proportions of the thing. I laminated two halves of a sheet of ADX together and routered out slots and openings for the webbed backing. It's probably obvious that the base is made of pallets and the frame for the back is 2x4 lumber. 

Those are the early pandemic projects. The storage stuff is next.


Saturday, November 2, 2019

a commission


A couple friends reached out to me wanting a custom piece, so I took a few hours and came up with a bunch of designs. A few made it to the modeling phase:
So now we get to nail down materials and finishes and get started. It'll be nice to make a custom piece for someone else again. It's been a while.
 
Update 7/6/21:
This one never made it beyond the drawing board for various reasons. I did end up making a simple countertop for one member of the couple, thanks to work-from-home becoming the standard in early 2020. Here's a  couple pics of that:


Monday, August 19, 2019

More Homesteading

The final part of this voluminous data-dump is the remodel of the front house. The place had a wonky foundation. It had been sitting on cedar posts for 90 years or so, and those had long ago rotted below ground level. The utility room was also an impractical little eyesore that felt like a cramped sauna. Not exactly the place I want to do laundry. And, in my opinion, the place kind of needed another bathroom and a covered porch. So that's what I built.

Here's the demo:
I salvaged as much of the old wood siding and framing as I could. Had to bag and dump all the asbestos that was on the back. After that, the foundation crew came in and leveled the place and poured piers for the addition. That's not very exciting to look at.

Here it is all framed and sheathed. You can see a little bit of the salvaged siding at the bottom there. Sanding and painting all that stuff wasn't my favorite thing to do.
But I did it.
And wired it. And ran vents. I did not plumb it, roof it, frame it, sheathe it, or insulate it. I left that to the pros. I did drywall, float, paint, tile, and cuss it.

The porch got lights and a fan. It's a nice spot: a square, shaded space with an open view of the garden.

The inside is actually a little tight for good photos, but here's what I snapped before the tenants moved in:

The mud room (utility sink, medicine cabinet). the occasional white tiles in the floor make a map of part of the night sky in the northern hemisphere. Yes, I'm a dork.
And the bathroom. The tub is refinished. Epoxy on the inside and I sealed the outside with a shellac that I dyed to look kind of like oxidized copper.
This is taken from where the washer/dryer is. Again, a little narrow, but the ceilings in there are 12 feet tall. It doesn't feel cramped.

A few other things happened outside, as well:

Laundry-to-landscape plumbing.
Divided the shipping container by getting the welders to move one of the doors to the back and part of the back wall to the front. Then I framed a wall inside. Viola.


And it was a good year in the perennial garden, as well. Tons of monarchs and tons of fruit so far, except the nectarines and peaches. Those are recovering from last year.

But yeah. I built some stuff and the city said it was OK.


And once I felt better, I felt compelled to work on yet another construction project

So after recuperating from the ER, I made a bucket list. I've been chipping away at it fairly steadily. I could stand to accelerate my progress a little bit, but that's another story. The point of this post is that the necessity for this next project came into focus, so being the determined guy that I am, I saved up, worked on a small project for my own humble abode (honestly, this was in the works while I was still at the Witte), and then went ahead with the planning, permitting, and construction.

First the interior design stuff in my place:

Poplar "butcher block" type slabs that I laminated together with biscuits and dowels, Piano hinge, and some mahogany table legs that I found for cheap at a thrift store.  Like I've said before, I like having something pre-existing to work off of.
Oddly, at this stage the place seems both small and empty. I wanted the built-ins to feel built in, so I made that happen:
And I'm sure you can guess what's coming next:

I'm a little proud of that piece of handiwork. It's part cabin, part tiny home, part mid-century inspired bachelor pad. kinda.

It definitely made the space more functional and fun. Only took a few weekends and lunch breaks.

Next post is the remodel...


There was that year that I went back into the museum business

For about 10 months from 2017 into the middle of 2018, I stepped back from my regular job and worked as the carpenter at the Witte Museum in San Antonio. In the end, it all came crashing down as I got burnt out working two jobs in two cities, and ended up in the ER with a still-undiagnosed infection that caused a fever of 104 and spots. My suspicions lead me to believe it was related to digging into the composted sewage that the front lawn's soil is made of. But I'm not positive and I'm not accusing anyone of anything. I'm just glad I have a little spare time again these days. Here's what I did in that short time at the Witte...

For the Gathering at the Waters exhibit, the designer wanted curved walls and pedestals. So we made them. We couldn't mess up the oiled oak floor, as the walls were temporary, so instead of notching metal plates, we made a giant compass and cut curved plywood plates. It turned out pretty well.


 We used the same process for the pedestal and railing here. The intermediate sticks weren't perfect. In retrospect, I would've suggested dowels through the posts.


The corners of the railings are all half-lapped, as well.


The pedestal here is one piece, as you can see below. It didn't really need to be, but it was lighter that way. It was still by no means light.

 Those half-lapped corners. The curved ones were a wee bit stressful to do, since they were custom milled by yours truly. Always make spares...

There was another exhibit of Fiesta dresses (Fiesta is a spring festival that I've only ever seen in San Antonio. Well, in Austin when I was younger, but they stopped for some reason). The fixtures we made for that were kinda cool:

There was the octagonal pedestal and railing that went in the octagonal room

And then there was the Jewel Box/Storefront Window that was pretty fun to do:

I had to scribe notches around the moulding there. I think it turned out alright.
I got to make some regular pedestals and a little bit of furniture as well. The job definitely had some fun moments.

But in the end it wasn't the best fit. C'est la vie. Next is the continued construction post for late 2018/early 2019...


Sunday, July 9, 2017

And then there's the "tradesy" stuff.

When "building" the house, I acted as General Contractor. I didn't do any labor I wasn't licensed to do, but I did what manual labor I could and used others' insurance and bonding to help move things along under their umbrella, and ended up saving a lot of dough that way.

I have to admit that digging ditches by hand is unpleasant. That's the only job where you start at the top. I also have to admit that I learned about working your way up, literally. If I had it to do over again, apart from a couple design changes, I would have done a couple other things in a different order. Always get your yard lines in first: water, gas, and sewage while you're getting the foundation dug.

But I'm not here to write a recipe.

Apart from the landscaping, I've done some other trade-based work that I think is decent, and I wanted to showcase that. It's funny: lately I kind of miss making art, but I've been pretty damn productive the past couple years, always with more projects in the works (and always with some that will probably never come to fruition). So here's what else I've been up to:

HOME STUFF

I found the cabinet at the Habitat for Humanity ReStore. It was pretty much the perfect size for our bathroom. It took some searching to find the closet door, but that really brought the design together. Now we have a shallow broom closet and a bathroom cabinet/laundry hamper.

 I kind of enjoy working with pre-existing pieces more than making things from scratch. I generally prefer to have a "problem to solve" than to design from scratch. I feel like the process is more interactive/surprising/dynamic that way. Above is the install all trimmed out, below is the cabinet painted to match the bathroom.

I wouldn't mind putting a cabinet door on the top, but that would only change the look, not the function. Not a top priority.

But there's more:

Working with more salvaged materials, I made some bookcases for the bedroom. The tops are laminated (doweled and glued-wish I'd had a better clamping setup, but they sanded out OK) cedar 2x4's made into a slab. Most of the carcass is 3/4" ply that I found on the street. Yes, that was pure luck. It had oddly been cut down to 7 feet long and not really anything else had been done to it, other than some running over. The tire tracks sanded out nicely.


I put 3/8" ply on the backs for rigidity. I had recently purchased a dado blade, so I put that to good use. The backs and most of the shelf joints were rabbeted, glued, and nailed. The tops are, too. The smaller shelf in the left hand one above is adjustable. Super easy to do: drill holes at regular intervals along the desired range of placement and use brass pegs to hold the shelf. All the carcass fronts are banded in 1/4" thick poplar. All the shelf fronts are banded with 1" thick strips of poplar for added strength under load. I hate cheap veneer edge banding and "deflection" under load.

The legs were the only significant material investment, but they were worth it. They bracket on very securely and they clear the baseboard.

I stained them with Danish oil, which gave me a little headache, even though I wore a respirator for most of it. Next time I'll wear the respirator when I mix the color. Live and learn.


 I gotta say they sit pretty nicely in the room.

There were some work projects to be done, as well.

The most recent location we opened required a fair amount of build-out. I ended up stripping and grinding concrete, reconfiguring displays, framing walls, and doing some finish carpentry as well.

WORK STUFF:

Here's the big wall that we framed in two days. That was pretty fun.


Here's the new bathroom, stubbed out and framed. Of course the A/C guy didn't mark his compressor locations very well and got miffed at the wall locations. As if he were the one whose project it was. I asked him to spray paint his locations. That didn't end up happening. Would you notice four 1/4" holes in THAT ceiling? I sure didn't. We installed a drop ceiling in the bathroom and it all ended up working out.

Bathroom
 Warehouse Dividing Wall (notice how it's woven into the pre-existing structural and electrical).

And here you see the old countertop that I reworked. It was just laminate over framing and chipboard. I made it ADA-compliant (like the bathroom above), clad it in salvaged wood, and put the butcher block countertop on it with the help of our most recent cabinet guy. Finished with Tung oil, which I prefer to the Danish stuff. It may not look all that fancy, but the sides of this counter are actually on compound angles: the top sits farther out than the base. You can see a little bit of the ground concrete joint to the right, as well. I hope I never have to do that again.

The shelves you see against the wall were in the store already, but reconfigured by yours truly. The library card catalogs were UT Surplus auction.

MORE HOME STUFF:

The last project of recent note is the built-in couch. There's storage under the left side, and the seat cushion on the right actually rolls out on a track to become a bed.


There's obviously storage in and on the back of the thing, too.

I will admit that I'm not much of a tailor or upholsterer, but I covered the thing in beige cotton duck. I started cladding the right-hand wall with wood as part of this project. That will eventually be covered, but there's a folding table and bench to build into the wall first (there's already blocking for them in the framing), then fill in around. Then our "almost tiny" home will be complete. For now we eat outside or sitting on the couch. I don't mind. The wife might a little bit.

Again, lots of angles, space, proportions to consider. Again, I'm just a beginner when it comes to building furniture. But I consider this a successful first foray into built-in seating. Because it's really quite comfy and it's proven to be an efficient use of space.

And there you have it. You're pretty much up to date on the "making" I've been doing.